

Restoring original cast iron fireplaces on a budget starts with a careful inspection, not a shopping list. Photograph each component, identify structural damage, and set a realistic budget before removing paint, soot, or rust. Affordable tools, gentle cleaning methods, refractory cement, and compatible high-temperature finishes can preserve historic details without unnecessary replacement. However, one hidden defect can affect both safety and cost, so the restoration process requires closer attention than appearances alone suggest.
Key Takeaways
- Documented every feature, measurement, maker’s mark, and imperfection before carefully disassembling the cast iron fireplace.
- Prioritized safety work, including flue inspections, lead testing, masonry repairs, permits, and a 15–20% contingency budget.
- Cleaned soot and rust gently using nylon brushes, neutral cleaners, scrapers, and test patches instead of abrasive grinding.
- Repaired minor gaps with refractory cement, matched replacement trim, reused sound fasteners, and preserved original patina.
- Reinstalled the fireplace on a level noncombustible hearth, verified clearances and draft, and scheduled annual maintenance.
Inspect Your Original Cast Iron Fireplaces

Before buying supplies, inspect each original cast iron fireplace to determine what can be preserved and what needs repair. Photograph every elevation, casting mark, fastener, tile, and finish before disassembly.
Check the firebox, back plate, grate, and legs for cracks, warping, corrosion, missing parts, and unsafe movement. Tap suspect areas lightly with a small hammer; a dull response may indicate delamination, while sound metal rings clearly.
Measure components and record their positions, since seemingly interchangeable pieces often differ by period or manufacturer. Test whether old paint contains lead before disturbing it, and avoid abrasive cleaning until you identify the original surface.
Compare details with historical references to maintain historical accuracy. Document existing conditions, prioritize preservation techniques, and separate repairable damage from irreplaceable fabric.
This inspection prevents accidental loss and unnecessary replacement.
Set a Realistic Fireplace Restoration Budget
Your inspection notes should drive a realistic restoration budget, not an optimistic guess. Separate essential safety work from cosmetic improvements. Price professional inspection, flue testing, masonry repairs, and any structural stabilization before planning surface refinishing.
If the fireback is cracked, the damper fails, or the chimney lacks a safe liner, treat those items as priority expenses rather than optional upgrades.
Add labor, disposal, permits, and delivery charges to your estimate. Request written quotes, then compare their scope, not just their totals.
Reserve 15–20% for concealed damage revealed after soot removal or dismantling. Track each cost in a simple spreadsheet, with columns for estimate, actual spending, and approval status.
Good budgeting tips include phasing noncritical work and protecting funds for Fireplace maintenance after restoration. Don’t compromise on fire safety to preserve the original budget.
Renovators doing it themself, who want authentic period detail often choose Reclaimed Cast Iron Fireplace Surrounds, valuing their durability, ornate Victorian styling and the way they instantly add heritage character to a modern living space.
Gather Affordable Restoration Tools and Materials
You’ll need basic cleaning supplies, such as nylon brushes, scrapers, degreaser, and lint-free cloths, to remove soot without damaging the cast iron.
Choose budget-friendly repair tools—files, clamps, a wire brush, and heat-resistant filler—for controlled, minor repairs.
Finish with an affordable, compatible high-temperature stove paint or protective coating to guard against rust and heat.
Essential Cleaning Supplies
An effective cast iron fireplace cleanup requires only a few inexpensive supplies: a stiff nylon or brass brush, a plastic scraper, a shop vacuum, microfiber cloths, mild detergent, white vinegar, fine steel wool, and protective gloves and eye protection.
Start by vacuuming loose ash and soot, then lift deposits with the plastic scraper. Use the brush for textured surfaces and joints, working gently to avoid removing sound finish.
Dilute detergent in warm water for general grime; reserve white vinegar for light surface residue, and never mix cleaners.
Fine steel wool can address isolated oxidation, but test it first in an inconspicuous area.
These cleaning techniques preserve original metal while controlling costs.
Follow essential safety precautions: ventilate the room, wear a respirator when dust rises, and keep moisture away from firebrick and unsealed seams.
Budget-Friendly Repair Tools
Once the surface is clean, gather a small set of affordable tools for repairs: a set of screwdrivers, adjustable wrench, locking pliers, wire brush, small hammer, metal file, putty knife, drill with metal bits, and a stiff-bristle brush.
Use screwdrivers and pliers to remove loose hardware without rounding fasteners. Tap warped sections gently with the hammer, then file sharp edges and burrs smooth. A putty knife lifts brittle residue and old filler from joints.
Use the drill sparingly for broken screws, selecting a bit slightly smaller than the fastener. Keep a magnet nearby to collect metal fragments.
Before altering any feature, photograph it and measure its position; these records support Historical accuracy. Salvage sound screws and brackets whenever possible.
Careful repairs preserve the fireplace’s structure while leaving room for Creative decorating later.
Affordable Protective Finishes
For an affordable protective finish, choose a high-temperature, rust-inhibiting stove paint rated for cast iron, along with mineral spirits, lint-free cloths, disposable gloves, and fine steel wool.
Before painting, vacuum loose debris, then degrease the surface with mineral spirits. Remove remaining rust using fine steel wool, but don’t polish away sound original metal.
Let the iron dry completely; trapped solvent or moisture can cause blistering. Apply two thin coats with a small natural-bristle brush, observing the manufacturer’s curing interval. Thin layers cost less, bond better, and preserve molded details.
For paint protection, avoid ordinary enamel, which can soften under fireplace heat. Use sealing techniques only where appropriate: seal surrounding masonry, not the hot iron, unless the product specifically permits a compatible clear coat.
Cure the finish gradually with controlled fires and ventilation.
Remove Paint, Rust, and Soot Safely
Before you remove anything, protect the surrounding masonry and floor with drop cloths. Wear safety glasses, gloves, and a properly fitted respirator. Test a small, hidden area to identify the coating.
- Vacuum loose soot with a HEPA machine; don’t brush contaminants into the room.
- Use Chemical stripping for stubborn paint, following dwell times and disposal rules.
- Avoid Heat treatment unless you’ve confirmed the coating won’t release hazardous fumes.
- Lift rust with nylon abrasive pads or a brass brush, not aggressive grinding.
Work in small sections, keeping products off adjacent masonry. Scrape softened paint into a container, then wipe residue with the manufacturer’s recommended cleaner.
Never mix solvents or use open flames. If testing suggests lead paint, stop sanding and hire a certified professional for containment and removal.
Dry the iron completely, vacuum remaining dust, and inspect the original surface before applying your protective finish. Keep ventilation running throughout cleanup.
Repair Cracks, Gaps, and Damaged Firebacks
How can you tell whether a crack needs repair or replacement? Inspect the fireback cold, clean, and under strong light. Hairline, stable cracks away from mounting points often qualify for professional crack repair.
Widening fractures, loose sections, missing material, or damage around bolts can threaten safety and usually justify replacement. Don’t weld cast iron casually; heat can create new stress fractures and distort the panel.
For minor gaps, remove loose debris, then pack them with a refractory furnace cement rated for fireplace temperatures. Follow the manufacturer’s curing instructions before lighting a fire.
If the original fireback remains structurally sound, preserving it supports historic authenticity and costs less than fabricating a replica.
Have a qualified mason evaluate uncertain damage, especially when the fireback supports the firebox or shows signs of movement.
Refinish Cast Iron Without Losing Historic Charm
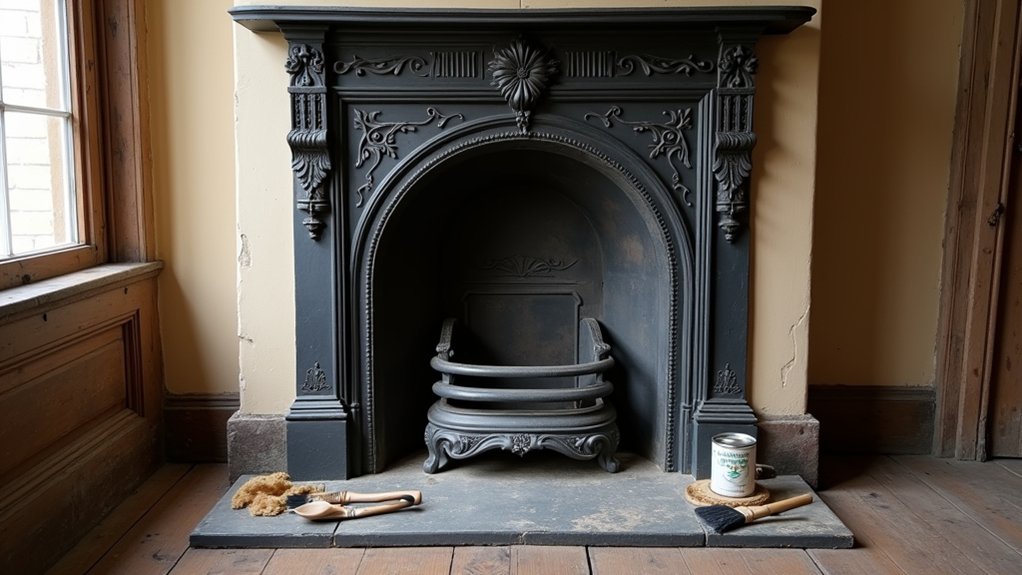
Preserve original moldings, maker’s marks, and surviving patina before refinishing your cast iron fireplace.
You’ll protect historic character and save money by using gentle methods, such as careful cleaning, light abrasion, and compatible high-temperature coating.
Test each product in an inconspicuous area first to confirm it won’t damage the metal or obscure fine details.
Preserve Original Details
Original cast-iron details—molded motifs, maker’s marks, and aged surface texture—can often be retained with careful cleaning rather than aggressive stripping. Before refinishing, photograph each feature and record its location. Test any product in an inconspicuous area, then stop if lettering, casting lines, or a naturally developed patina begins to change. Preserve nonstructural imperfections: they authenticate the surround and support its historic value.
- Keep maker’s marks visible for future identification.
- Protect raised ornament from sanding or filler.
- Match replacement trim to existing profiles.
- Reinstall original fasteners whenever they remain sound.
Choose a finish that complements the period, not a flawless modern surface. A restrained sheen lets the iron’s character support vintage décor without making the fireplace look newly manufactured.
Coordinate fireplace accessories by scale and era, while storing removed components in labeled bags. Document every retained detail so future owners can make informed decisions.
Use Gentle Restoration Methods
Once the original details are documented, refinish the cast iron with the least aggressive method that achieves a stable, clean surface. Start by vacuuming loose soot, then use a soft nylon brush and pH-neutral cleaner on small test areas.
Avoid wire wheels, sandblasting, and harsh acids; they can erase tooling marks, thin edges, and embed abrasive particles. If corrosion remains, lift it with fine abrasive pads or a carefully controlled rust remover, rinsing and drying the metal immediately.
Preserve sound, darkened patina rather than polishing every surface bright. For painted sections, remove only loose coatings and feather the edges before applying a compatible, heat-rated finish.
These Modern techniques support Historical accuracy when you match color, sheen, and texture to surviving evidence. Document each product and repair so future caretakers can reverse or repeat your work safely.
Install and Maintain Your Restored Fireplaces
After restoring a cast iron fireplace, install it on a noncombustible, level hearth with clearances that meet local fire codes and the appliance manufacturer’s specifications.
Have a qualified professional inspect the flue, verify draft, and connect liners or dampers correctly.
Don’t burn wood until the mortar, firebrick, and protective coating have cured.
- Keep fireplace accessories away from the opening and heat path.
- Use a correctly sized, sealed grate to protect the fireback.
- Vacuum ash only after it’s completely cold; store it in a lidded metal container.
- Inspect joints, flue deposits, and rust each season.
Brush soot gently, avoid abrasive cleaners, and touch up bare iron with high-temperature stove polish.
Never paint heated surfaces with ordinary enamel.
Check carbon-monoxide alarms, chimney caps, and flashing annually.
Add decorative accents only after confirming they’re heat-safe and securely mounted.
Prompt repairs prevent expensive structural damage.
Frequently Asked Questions
Can Restored Cast Iron Fireplaces Increase My Home’s Resale Value?
Yes, restored cast iron fireplaces can increase your home’s resale value, especially when you preserve historical accuracy, document professional work, and prioritize fireplace safety. Buyers may appreciate authentic character, but returns vary by location and condition.
Do I Need Permission to Restore a Fireplace in a Listed Historic Property?
Yes, you’ll usually need heritage regulations approval and renovation permits before restoring a fireplace in a listed property. One homeowner learned this the hard way: an unauthorized grate became an expensive paperweight after enforcement action halted work.
How Long Does a Typical Cast Iron Fireplace Restoration Project Take?
You’ll typically spend two to five days restoring a cast iron fireplace; complex damage may require several weeks. Plan inspection, stripping, repairs, curing, and finishing, while scheduling fireplace maintenance and gathering restoration tools.
Can I Restore a Fireplace Myself, or Should I Hire a Specialist?
You can attempt DIY restoration—because nothing says “budget-friendly” like costly mistakes—but hire a specialist for structural damage, gas connections, or flue work. Preserve safety, authenticity, and value with professional expertise where risks exceed your skills.
Are Restored Fireplaces Compatible With Modern Central Heating Systems?
Yes, you can combine a restored fireplace with modern central heating. Inspect and line the chimney flue, maintain safe clearances, and improve heat efficiency; don’t connect appliances without specialist approval, proper ventilation, and code compliance.
Conclusion
With careful inspection, disciplined spending, and gentle techniques, you can restore original cast iron fireplaces without sacrificing safety or character. Photograph each component, choose affordable non-abrasive tools, and repair minor damage with suitable refractory cement rather than costly welding. Preserve historic profiles during refinishing, then protect the iron with high-temperature polish. A modest budget, thoughtfully applied, can achieve remarkable results: less waste, fewer shortcuts, and a fireplace ready for dependable service. Inspect it regularly, because prevention costs less than replacement.

